Saturday 30 October 2021

How to configure SQL Server Log Shipping

SQL Server Log shipping provides a DR (disaster recovery) solution for the SQL Server databases and it can be configured at the database level. In a specific time-gap, SQL Server Transaction Log backup will be taken and copied to the destination site and will be restored. This complete activity or solution will be done by SQL Server job and each step is configured by the user. The learner may confront the difficulties in a couple of steps or while troubleshooting but for the experienced user, it is too easy to set up and handle the SQL Server log shipping set up errors.

Transaction logs contain a log of all the transactions happening in a SQL Server database. This is extremely helpful in preventing data loss in case of a system failure, in case, you are new to transaction logs in SQL Server, these logs are described in great detail here, A beginner’s guide to SQL Server transaction logs.

SQL Server instance from which the transaction log backup is shipping is called as primary and the SQL Server instance where transaction log backup is copying and restoring is called as the secondary in the SQL Server log shipping. Before beginning the setup of SQL Server log shipping, the database must be in full recovery model or Bulk-logged is the mandate thing in the SQL Server log shipping. If your database is not in the full recovery model or Bulk logged then below the T-SQL proclamation can assist with making it in Full or Bulk-logged model.

To make your database in the Full recovery model:

To make your database in the Bulk Logged recovery model:

Here, the publisher is the database name at the primary server end. Even the database recovery model can be changed by SSMS also with utilizing the directory as below:

Right-click on database name >> Property >> Option >> Recovery Model

If your database is not in Full or Bulk Logged recovery model, then SQL Server Log shipping step will return an error as “This database cannot be a primary database in a log shipping configuration because it uses the simple recovery model. You must use the full or bulk-logged recovery model before transaction logs can be generated.“.

Configure SQL Server Log shipping with the help of SSMS

As an initial step, the publisher database must be enabled for the SQL Server log shipping configuration. To enable the SQL Server log shipping at the primary end, open the property of the database or expand the task list of a database in the SSMS.

Click on the Ship Transaction Logs; a checkbox will be available with the title as Enable this as a primary database in a log shipping configuration. Select this checkbox to proceed ahead:

Ship SQL Server Transaction Log

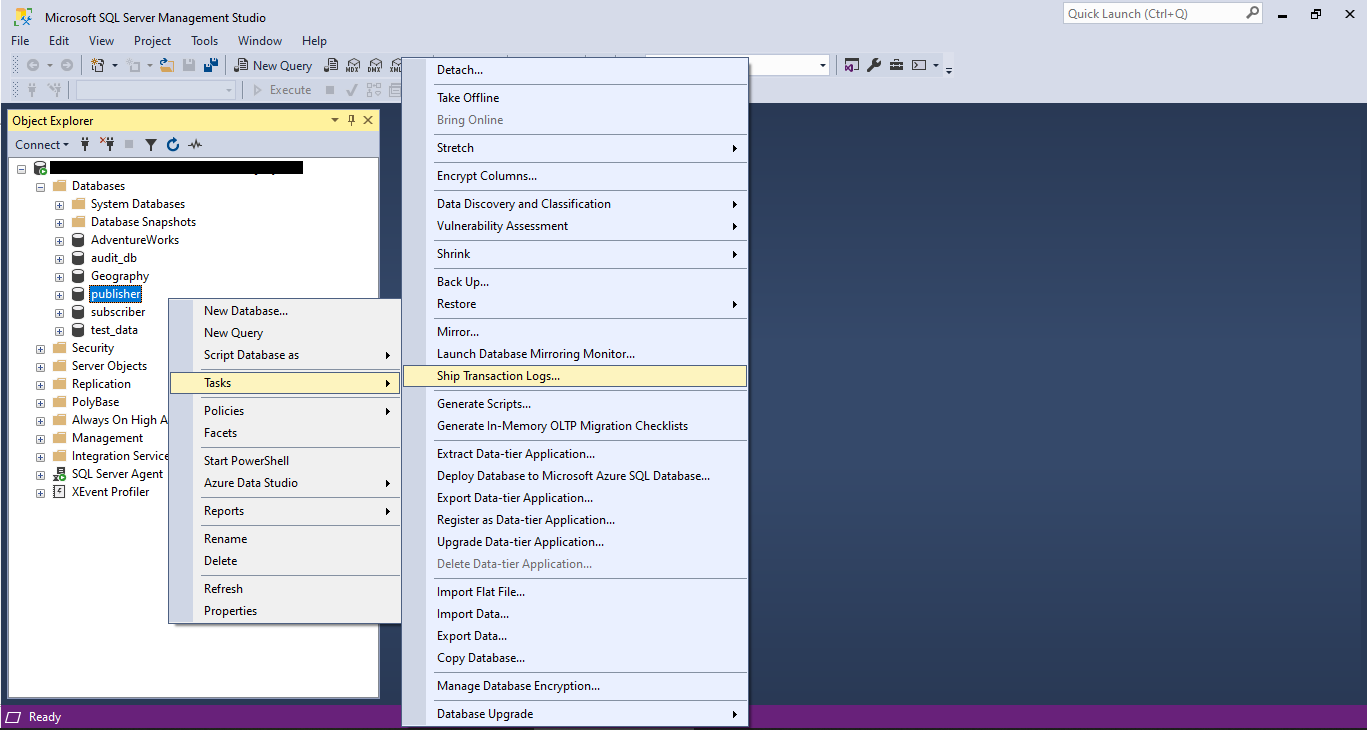
Here, we are going to setup SQL Server Log shipping for the publisher database.

Enable the database for SQL Server Log shipping configuration

As stated above, a database needs to be enabled for this SQL Server Log shipping configuration. When this checkbox is selected, the user will be allowed to schedule the SQL Server transaction log backup job.

Backup Setting button will allow the user to set up the scheduler of SQL Server transaction log backup.

Transaction Log Backup Settings

SQL Server transaction log backup setting screen allows addressing the backup folder path. Both the Network path and the file system path should be specified in the form. This is the file system location where a backup job will put the transaction log and it will be picked up for copy and restore to the secondary server. You will notice a few more fields in the dialog box.

Delete files older than parameter is to delete the transaction log after (n) Hours/Minutes/Days.

Alert if no backup occurs within parameter is to alert if a backup does not occur within (n) Hours/Minutes/Days.

Configure SQL Server Transaction Log backup directory

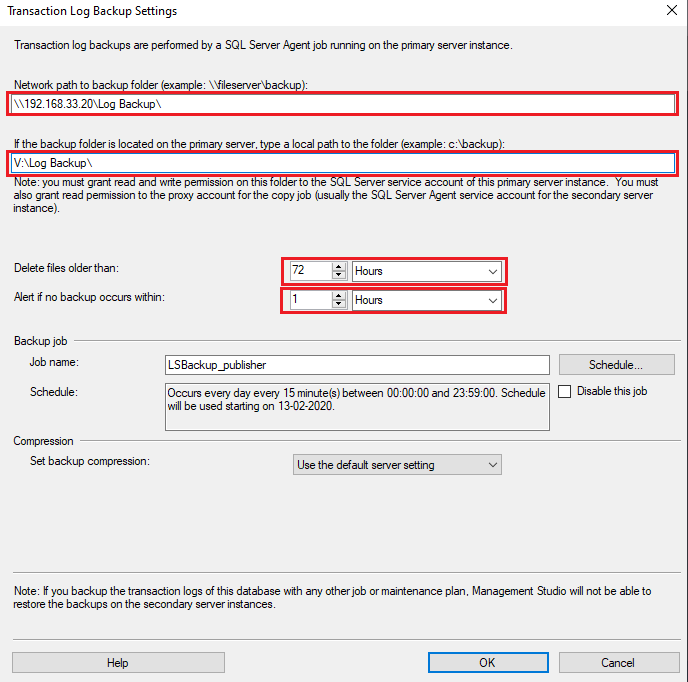
For example, 72 hours is defined for the Delete files older than the parameter value. So here, the file will be deleted from the file system after 72 hours. Make sure that the file should be copied to the destination or secondary server before deleting it. If any backup does not occur on the primary database within 1 hour, then an alert will be triggered because Alert if no backup occurs setting value is 1 hour in the above screen.

Users can have the right to change the backup job name as well if the user wants to modify it.
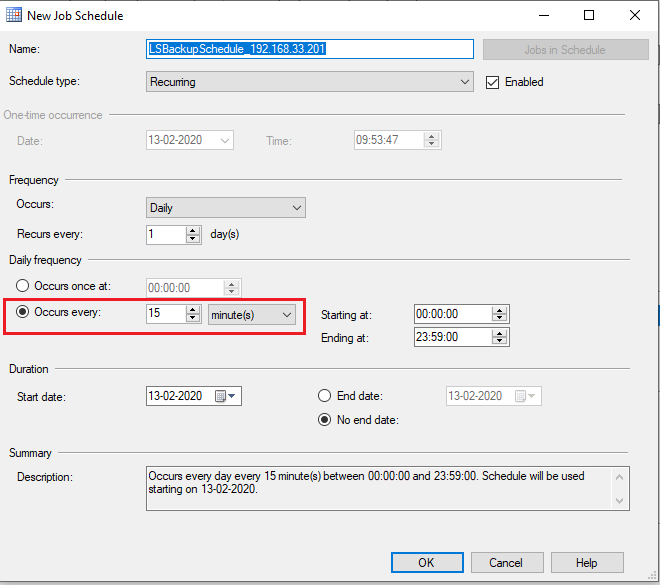
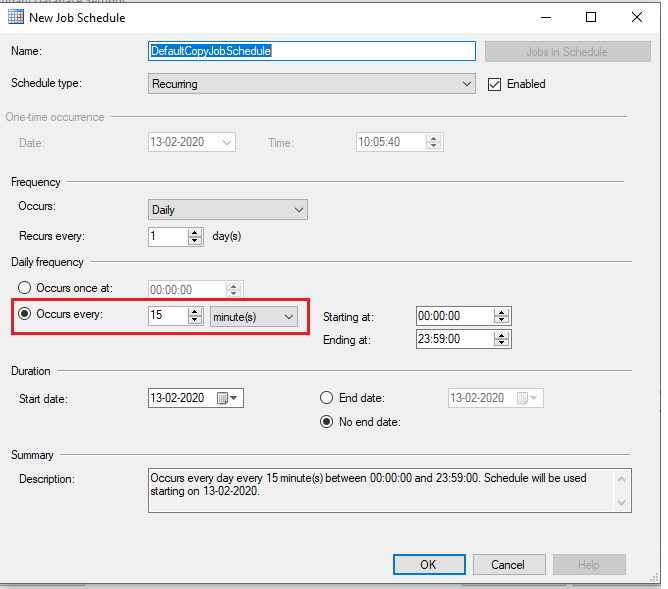
Backup Job Schedule

Click on the Schedule button in the Transaction Log Backup Setting form. The user will allow configuring the job properties. The scheduler can be defined to run with a polling period in a unit of minutes, hour or day. By default, the setting is to run a backup job in a time gap of 15 minutes. The job execution polling period depends on the backup plan because it is dependent on the reading of a number of transactions in (n) minutes in the database, Transaction Log backup size and very important thing RPO (Recovery Point Objective) and RTO(Recovery Time Objective).

Backup Scheduler

Configure secondary server instance and databases

Once database backup is scheduled, the SQL Server transaction log backup process will be started to create one full backup of the database. Now, at the secondary or disaster recovery site, that transaction log backup needs to be restored to make it in use as primary when disaster happens.

Click on the Add button, SQL Server will ask to add the instance name and database details on which transaction log backup is going to be restored.

Add subscriber for the SQL Server Transaction Log

Secondary Database settings (Initialize the Secondary Database)

The secondary server instance field can be filled up by SQL Server instance name or SQL Server instance IP address and Port number. On a successful connection, the database name will be visible in the drop-down list of the Secondary database field. The user needs to select the database name, on which a user wants to restore the SQL Server Transaction log backup.

Choose Secondary database

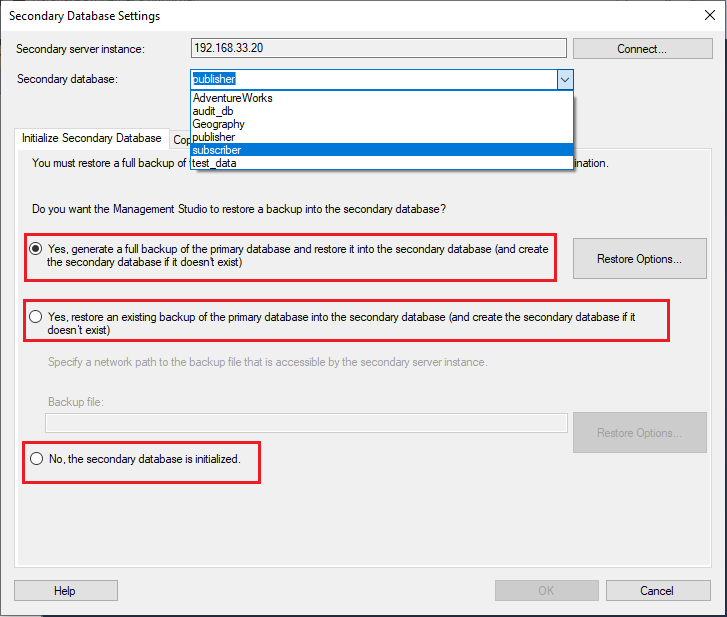
Before shipping the transaction log at the secondary site, a full backup of the primary database must be required to restore at a disaster site or secondary instance end. To perform the restoration of a full backup, SSMS will ask to perform restore operation with three options.

Yes, generate a full backup of the primary database and restore it into the secondary database (and create the secondary database if doesn’t exist). This option will take a full backup of the primary database on the backup folder directory by the backup job and then the backup will be copied to the secondary server and then the backup will be restored on the secondary database.

Yes, restore an existing backup of the primary database into the secondary database (and create the secondary database if it doesn’t exist). If already database full backup is generated by the user or exists, then the user will be asked to specify the network path of that full backup. Once a backup is verified, a copy job will move that backup file to the secondary site and backup will be restored by the scheduler job.

No, the secondary database is initialized. When a backup is manually restored by the user at the secondary site, then this option will be selected. When a user wants to configure SQL Server Log shipping for the large-sized database, then database administrators always use this option. But make sure that the database needs to be restored with No recovery or Standby mode.

Secondary Database Settings (Copy Files)

Copy files screen will ask the user to fill up the destination folder for copied files on the secondary or disaster site. Usually, that folder directory path should be located on the secondary server. Transaction log backup will be restored on the secondary database from this directory. You will find one more parameter, Delete copied files after. Same as the primary site, transaction log backup will be deleted from the file system after the (n) Hours/Days.

Here, 72 Hours is defined for the above SQL Server Log shipping configuration. So, the SQL Server Transaction log backup file will be deleted after 72 hours. The user will allow modifying the Copy job name as well.

Copy Job Configuration

Users can configure the copy job scheduler property as defined in the below screen. Occurs every parameter will allow defining the polling period of job execution. Here, we have used default values as 15 minutes for this setup.

Configure job for Secondary database

Secondary Database Settings (Restore Transaction Log)

The last step at the secondary site is the configuration of the restore process of SQL Server Transaction log backup. The database must be either in No recovery mode or Standby mode when the Transaction log is shipped on the secondary. Users will be asked to select any one of them (No recovery / Standby).

Delay restoring backups at least and Alert if restore occurs within are two options in the Transaction log restore step. If a user wants to cause some delay in the restore of the database after copying, then the delay can be defined with (n) in Minutes/Hours/Days. If any backup is restored within the (n) minutes, then alert will be triggered to the configured mail list.

Configure job for Secondary

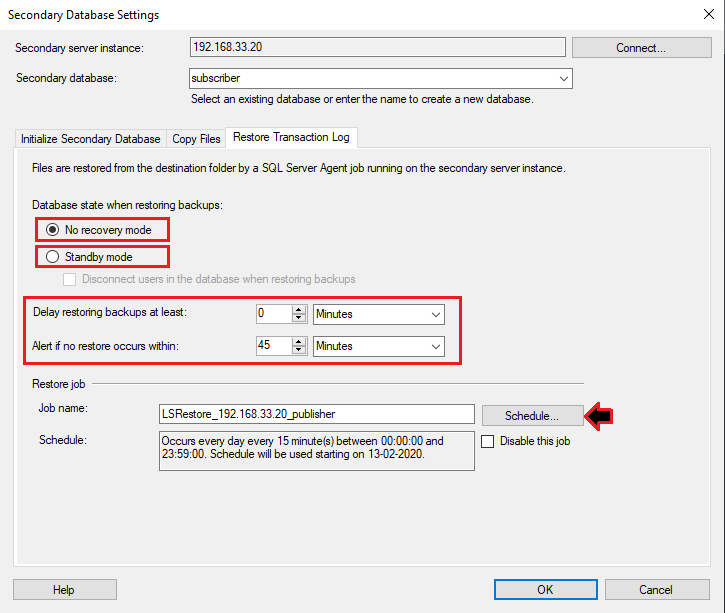
Here, the user is allowed to modify the Restore job name.

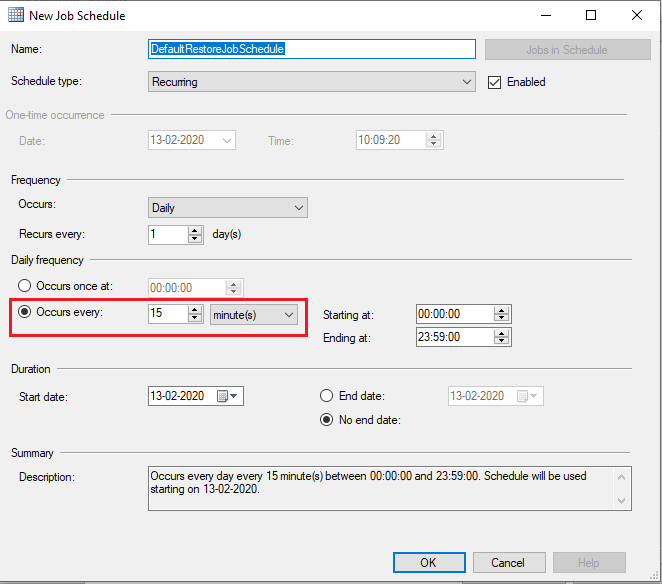
Restore job configuration

Users can configure the restore job scheduler property as defined in the below screen. Occurs every parameter will allow defining the polling period of job execution. Here, we have used default values as 15 minutes for this setup.

Configure Restore Job

Save SQL Server Log Shipping Configuration

Save SQL Server Transaction Log Configuration

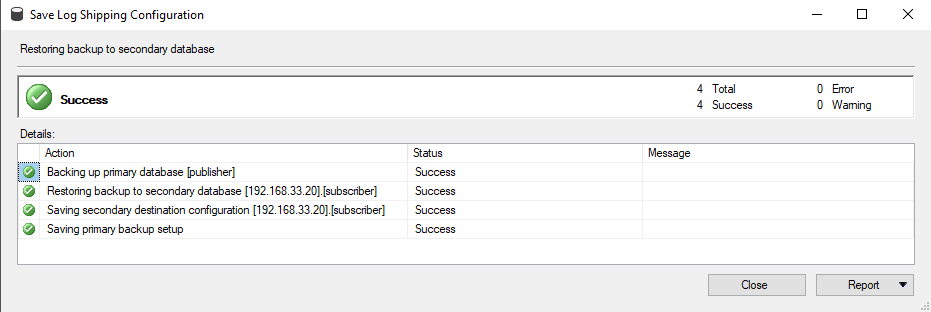
On save Log shipping configuration, the configuration will be saved and the job will be created at the primary and secondary end. The below screen will show you the status of each action of the Log shipping. If any of the action is failed, then Status will be failed with the error message, refer to the below screen.

List database with Restoring mode

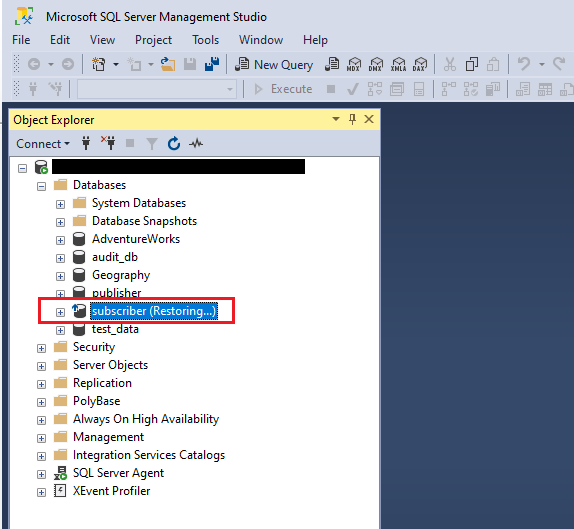
On a successful set up of Log shipping for the database, the user can check the secondary database at the disaster site. In the below screen, the secondary database subscriber is in the restoring mode, which means SQL Server transaction log backup is getting restored.

After a successful setup of a log shipping, a user must monitor the complete process of Log shipping on a daily basis.

Summary

In this article, we learned how to configure the SQL Server Log Shipping feature in SQL Server and how it works with transaction log backups to handle Disaster Recovery. You can read more about this topic here, what is SQL Server log shipping.

Automation SAP Kernel Upgrade maintenance using LVM tool

Introduction

This blog post Simplify system landscape management tool which we can implement in SAP landscape to perform SAP standardize activities in day to day support operations like system restart Kernel upgrade. This SAP tool can be  used as add-on in SAP NetWeaver JAVA application to automate multiple activities

  • Automate repetitive, time-consuming system administration tasks ( system restart, Kernel upgrade) and orchestrate to our specific needs using Custom Operations/Hooks option. 
  • Centralize landscape management has greater importance and gain landscape-wide visibility to control across infrastructure layers.
  • Key functionality does LVM standard edition implements in SAP landscape


  • Dashboards and Pods:   Get a quick high-level overview of current landscape state.
  • Single/Mass Operations:   Centralize operations (Application, database, restart,    kernel upgrade, validation) for entire landscape using a single console.
  • Landscape Visualization:   Visualize systems and underlying infrastructure and identity relationships.
  • Custom Operations/Hooks:  Integrated custom scripts to perform kernel upgrade
  • Task Scheduling:   Schedule and execute mass or sequential tasks during planned maintenance.

Due to the multiple SAP systems maintenance restart, manually kernel patch upgrade, the following problems faced in the environment


  • Many resource required to work during Monthly/Quarterly Maintenance activity on weekends to complete kernel upgrade and other maintenance activity which required system restart for SAP instances.
  • Huge administrative tasks handled by the resources for multiple systems restart during schedule maintenance activity or on demand activity
  • Huge effort and resource time to perform kernel upgrade manually on each application server
  • Due to downtime restriction adding multiple systems in maintenance window and perform kernel upgrade not possible
  • Resource needs to login in each system to perform restart, Kernel upgrade and validation manually

Install LVM standard edition tool add-on which is available to all SAP customers for free of cost in  service market place, Although this LVM tool (LaMa tool) does not has any feature to automate kernel upgrade, to overcome this we  can create custom scripts at OS level and integrated with  LVM tool using Custom Operations/Hooks so that kernel upgrade can also be automate.

Below are the step by step configuration  that I did to accomplish the for-

Application restart with cleanipc command

Database restart with listener

Kernel backup/upgrade using custom operations scripts

Technical Prerequisites

Below Minimum Versions required to use LVM tool Custom scripts

SAP Hostagent 25

SAP NetWeaver 7.4 JAVA application

SAP LVM add-on VCM LVM and VCM LVM CR 2.0 SP10

Note – Please check latest version available in service market place and if possible use latest versions.

Configuration

Install LVM Add-on and hostagents.  

  • Download VCM LVM and VCM LVM CR add-ons tools from service market place https://launchpad.support.sap.com/#/softwarecenter/ and deploy on SAP NetWeaver 7.4 JAVA  using TELNET or SUM

To be able to start and schedule own scripts  in LVM (LaMa Tool), many tasks need to be perform in sequence.

Adding System in tool 

  • Login to LVM  tool for adding systems http://<host>:<port>/lvm.
  • Go to Configuration — Systems– click to add ( determine) for adding system
  • Select  Discover using host and instance under source
  • Provide host name , SAPADM, <sid>adm and oracle user for database
  • Click next to complete the system addition
  • Go to Operations  to check the system status which added


  • This standard tool has only option to restart system but we integrated custom UNIX shell scripts to perform, cleanipc command, kernel upgrade, backup of exiting kernel executable directories,  listener restart.

Creation of custom script files at OS level

Name: Script name

User name : User which has full authorization to execute script, in my case its sapadm

Command: Command which will execute to perform task below is example for kernel backup and upgrade

  • To create custom scripts go to manage host which added in this tool
  • Go to /usr/sap/hostctrl/exe/operations.d
  • In this file, location of the real script is configured. If possible there should be only one location for all scripts on an nfs-share. Configuration file must contain following lines and should look like
  • Here I created two scripts  LVM_backup_kernel.conf and LVM_Kernel_Upgrade.conf

  • LVM_backup_kernel.conf – This scripts has command to kill all processes running from sidadm , run cleanipc command and take backup of kernel directories for all instances running on particular host.
  • LVM_Kernel_Upgrade.conf – This scripts has path of kernel SAR files from where it will be extracted to Kernel directory in to each instance

Add Custom operations and register scripts in LVM Tool

  • Go to LVM tool — SETUP ( top on right)– Custom Operations
  • Give Custom operation name and select appropriate option
  • Register custom scripts created at OS level
  • Click on “provider implementation definition” tab
  • Provide Name, Select “script registered with host agent
  • Jump to “Get registered scripts from host”  check required options
  • Select host which have added in this tool and on which custom scripts created
  • Click on “Get registered scripts”
  • Select “Registered script” to add script in my case I added “LVM_backup_kernel” which was created.
  • Save

Follow the same for other script LVM_kernel_upgrade to register.

Schedule Kernel upgrade, application, database restart, activity  from LVM tool

Scheduling

  • Go to Automation tab Schedule kernel upgrade, click on ADD
  •  Select options as per your requirement, below I select sequential operations for stopping application, database, backup of kernel directories on all instances, kernel upgrade, start database and application validation if needed.
  • Provide date and time when you wants to perform activity
  • Provide email ID for notification on successfully /failed  of activity.
  • Below automatic execution sequence is scheduled for the system along with kernel upgrade
  • While scheduling task, select dependency to perform start and stop sequence in case multiple application servers
  • Below task scheduled  in sequence:-
  •      Stop Central Instance
  •      Stop Central service
  •      Stop Database
  •      Execute custom script om central instance host for kernel directory backup
  •      Execute Kernel Upgrade
  •      Start Database, Central service and Central instance then
  • Check the status of automatic execution  under “monitoring” tab and logs
  • Post execution notification on Kernel Upgrade status


In this blog post we are able to automate kernel upgrade along with application and database restart, we can add more custom scripts to automate many other activities on LVM (LaMA) Standard edition version.

  • Custom Operations based on SAP Profile Change
  • Custom Operations based on HANA Profile Change
  • Enables to perform mass – operations on the entire pool of systems (stop/(re)start etc.
  • Define a target state (e.g. not running) for any instance (e.g. App Server).
  • Enable to execute Operating System Update and Hostagent patching
  • Enable Application validation

Currently LVM has two Editions, We used Standard Edition which is available for all  SAP customers for free,  For Enterprise Edition Customer has to pay License fee.

SAP S/4HANA Conversion Road Map: High Level – SAP Basis

Introduction:

I, Pradeep Srigiri working as Architect and has around 15 years of experience in SAP. Currently, I work for YASH Technologies. This blog post consists of High-Level technical information on S/4HANA Conversion Road Map from SAP Basis perspective from On-Premise to Cloud or Vice-Versa or Cloud to Cloud. However, I would like to recommend following the SAP Standard Guides & SAP Notes during the S/4HANA Conversion Process. This blog post will take you there in a structured method for current release and can use same process for other releases to find out the details easily.

SAP S/4HANA Conversion Road Map:

The blog post consists of the below steps.

Discovery Phase
System Requirements & Planning:
  • Supported OS Versions for S/4HANA 1909
    SUSE Linux 12.0 or greater
    RHEL 7.0 or greater
    AIX 7.1 & 7.2
    Microsoft Windows 2016 or 2019
  • Supported DB Version – S/4HANA 1909
    HANA 2.0 SP04 (Min)
  • Minimum Source Versions with UNICODE required for S/4HANA 1909
    SAP ERP 6.0 SP20
    EHP2 FOR SAP ERP 6.0 SP10
    EHP3 FOR SAP ERP 6.0 SP09
    EHP4 to EHP8 FOR SAP ERP 6.0 No minimum SP required.
  • Compatible NetWeaver versions for S/4HANA 1909
    SAP NetWeaver 7.0 SP14
    SAP EHP1 for SAP NetWeaver 7.0 SP05
    SAP EHP2 for SAP NetWeaver 7.0 SP06
    SAP EHP3 for SAP NetWeaver 7.0 SP01
    SAP NetWeaver 7.4 SP02
  • For Cloud Support OS, DB & SAP, Check the below SAP Notes
    1656099 – SAP Applications on AWS: Supported DB/OS and AWS EC2 products
    1928533 – SAP Applications on Azure: Supported Products and Azure VM types
    SAP Note 2456406 – SAP on Google Cloud: Support Prerequisites
  • Compatibility Matrix Checks – use PAM in SAP Support Portal
  • Tools Used – DMO of SUM 2.0 SP8 (Latest) if Source is on non-HANA DB
    DMO with System Move for Conversion with DB Migration & data center relocation
  • Use Data Volume Reduction – SAP Data Volume Management
    Reduces the data footprint & achieve a shorter conversion duration
    Capabilities supporting the pre- and post-conversion phases
    One central tool is the SAP DVM Work Center (DVM WoC) in SAP Solution Manager
  • Maintenance Planner
    Generates the download files for Conversion
  • List of supported add-ons see SAP Note 2214409.
  • Business functions can have the following status: always_on, customer_switchable, and always_off (SAP Notes 2240359 and 2240360)
  • Checks Industry Solutions – SAP Note 2799003

  • SAP Solution Manager & SAP Systems – Backend SAP Support Connection
  • To download & implement the SAP Notes
  • To Pull the Latest Simplification Items from Support Portal to run the reports

Conversion Pre-Check:

Readiness Check

  • Implement SAP Note 2758146
  • RC_COLLECT_ANALYSIS_DATA is the Report
  • Activity 16 (Execution) of Authorization Object S_DEVELOP is required
    • For Discovery Phase Selection
    • Implement SAP Note 2185390: Set up custom code analysis
    • Implement SAP Note 1872170: Enabling SAP S/4HANA sizing
    • Implement SAP Note 2399707 – Simplification Item Check
    • Implement SAP Note 2769657 – INR: Interface Discovery for Idoc
    • Implement SAP Note 2721530 – Enabling Data Volume Management analysis
    • Implement SAP Note 2811183 – Enabling BP/CVI Analysis with Readiness Check 2.0
    • Implement SAP Note 2781766 – Enabling ATC check result export for SAP Readiness Check 2.0
    • Implement SAP Note 2502552 – S4TC – SAP S/4HANA Conversion & Upgrade new Simplification Item Checks
  • I Executed the Report RC_COLLECT_ANALYSIS_DATA in SE38 choosing relevant pre-check options (Background)
  • Launch the SAP Readiness Check application using https://rc.cfapps.eu10.hana.ondemand.com and use the ZIP file that was generated from the program RC_COLLECT_ANALYSIS_DATA.
  • To create a new analysis, I have clicked Create New Analysis

  • SAP Readiness Check 2.0 will be ready under 30 minutes and followed with Pre-Checks Analysis
  • For Custom Code Adjustments – Run program SYCM_DOWNLOAD_REPOSITORY_INFO
  • Download the ZIP file and upload it to the Readiness check Link by selecting “Update Analysis”


Addon Compatibility Check

  • Retrieves the add-on and business function data from Maintenance Planner
  • Check SAP Note 2214409

  • Business functions
  • Simplification Item Check to identify the mandatory steps before converting your system.
  • CVI Conversion Prep

Custom Code Migration & Simplification Item Checks:

  • Need to be performed by the respective teams using the latest custom code apps provided by SAP and implement the SAP Notes related to the Simplification Item Checks in the system before the Basis Team runs the SUM tool to start the Technical Conversion

Conversion Planning – landscape

Parallel Landscape Build

  • Implement emergency fixes and to reduce the timelines for the code-freeze – build a parallel conversion/migration landscape.
  • Any emergency change that is implemented in production landscape should also be applied in conversion/migration landscape.


It’s always recommended to have Sandbox ready with a copy of Production System in order to start the S/4HANA Conversion to have a better under standing on the impact and procedure that can be followed in the upcoming systems with lessons learn during the Sandbox System conversion. However, the above Parallel Landscape is being used only for Development, Quality & Production Systems

High Level Roadmap

  • Below pictorial diagram shows the process flow to achieve S/4HANA Conversion & Migration to Cloud or to On-Premise


High Level Cost Estimate

H/W Estimates:

  • To determine the H/W sizing, implement SAP Note 1872170: Enabling SAP S/4HANA sizing
  • Execute the program /SDF/HDB_SIZING in SE38

  • or select the pre-check option in SAP Readiness Check Report RC_COLLECT_ANALYSIS_DATA

Result: Upload the ZIP file in Readiness Check Link

  • Below is the Sizing information

  • Sizing for SAP Applications can be determined based on the current landscape for DEV, QAS & PRD systems with some additional increase in the Hardware Resources

S/W Estimates:

  • Based on the system requirements column, any one of the mentioned releases & version can be on the source system to perform the conversion to S/4HANA
  • S/4HANA 1909: Impact on current landscape – Use Upgrade Dependency Analyzer from Support Portal : https://apps.support.sap.com/sap(bD1lbiZjPTAwMQ==)/support/uda/main.htm and System Requirements for NetWeaver
  • Procurement of S/4HANA License from SAP
  • Identify the Solution Approach based on the existing releases
  • Based on the Solution Approach, estimate the man days required for Basis to perform

Pre-Conversion Action list

Basis:

  • Implement SAP Notes related to pre-checks using SNOTE
  • Remove Client 066 – Not used in S/4HANA: Check SAP Note 1749142
  • Uninstall Fiori Apps – if not released for SAP_UI 7.50: Check SAP Note 2034588
  • Use Maintenance Planner to calculate stack.xml file and download files required for S/4HANA conversion
  • Perform OS Prerequisites on S/4HANA Application & Target HANA Server
  • Download the HANA Installation Media
  • Setup Target HANA Server based on the Installation Guide
  • Perform the prerequisites for HANA DMO – if required. For Prerequisites check SAP Notes 2882441 & 2832250
  • Download SUM 2.0 SP8 on Source and Target Application Servers with the downloaded files

Target Landscape

  • Based on the source SAP, DB & OS versions – below are the Major migration options

Note: Target or Source can be On-Premise or Cloud

  1. One Step Migration: HANA DMO with S/4 HANA Conversion during the same maintenance window

2. Two Step Migration: Existing SAP/DB Upgrade and HANA DMO with S/4HANA Conversion

or

Lift & Shift AS-IS to Cloud and HANA DMO with S/4HANA Conversion

  • HANA DMO required if source is on Non-HANA DB

Conclusion:


I would like to conclude that I have validated the SAP SUM DMO Guides and S/4HANA Conversion Guides from Support Portal and relevant information from the Notes mentioned in this blog post. I have followed the above mentioned steps & process and was able to achieve the goal which is S/4HANA 1909 conversion.

Reference below:

https://help.sap.com/doc/2b87656c4eee4284a5eb8976c0fe88fc/1909/en-US/CONV_OP1909_latest.pdf

SAP HANA DB ANALYSIS AFTER ISSUES

To be able to further analyze your issue and environment please download the attached shell script you can get from KBA: 3218277 - Collectin...